To add an image drag and drop it onto the topic or tap on the topic toolbar ![]() and the image tool
and the image tool ![]() . See also the video at the end of this page.
. See also the video at the end of this page.
After adding the image, use the resize tool ![]() to make the image bigger or smaller.
to make the image bigger or smaller.
Add an image inside or outside the topic

An image inside a topic will be placed above the topic text. You can add one image inside a topic.
An image outside the topic has no visible connection to the topic. You can add as many images outside a topic as you want.
Use “Add topic with image” to add child topic without borders, showing the image only.

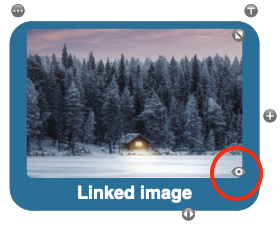
Add a linked image
If you want to be able to see the image in full size, add a “linked image” or linked image in topic”. Use the view tool to view the image in the larger or original size.

Depending on where the mind map is stored you can choose to:
- Include in Mind Map file. A copy of the image is stored in your mind map file. This means you can always see the full-size image, even when you share the mind map with someone else or other devices. However, this increases the size of your mind map file. Large mind maps can take very long to synchronize via clouds.
- Link to source. The thumbnail links back to the original image’s current location.
- Upload to cloud. A copy of the image is uploaded in the same directory as the mind map.
Note, links to source or cloud may not work on other devices.
Move images
- When you move the topic, the images moves with it
- Drag an image to move it around. In free form layout you can move it anywhere on the mind map. In auto layout this changes the distance between the topic and the image.
- Move an image image inside/outside the topic via the topic toolbar or image toolbar
 and the image tool
  .
.
Tips
- Use large images with discretion, it demands a lot more from your device and your internet connection.
- On touchscreens use 2-finger-swipe to move the mind map instead of the image or topic. Or use the lock button to lock the image to a fixed position.
- Images can be cropped to a different shape via Element Style.

- Use Preferences – Image to set the default sizes for images and the default crop to shape.
- Mac and Windows: Press and hold “Shift” to scale the image instead of resizing.
- Windows and Mac: Drag and drop an image onto the topic to move it to inside the topic. Use Control to suppress this.
- To move it outside the topic, use the topic toolbar, the image tool and select “Move Image outside topic”.