Support
SimpleMind Pro
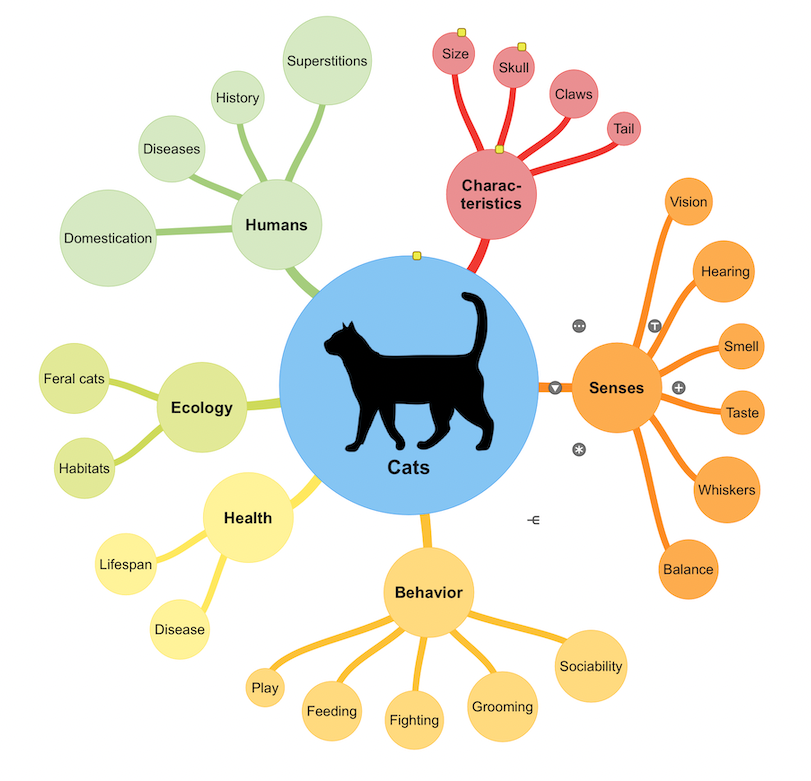
The Basics
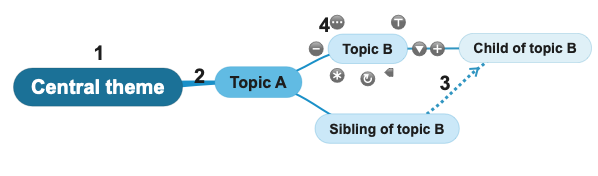
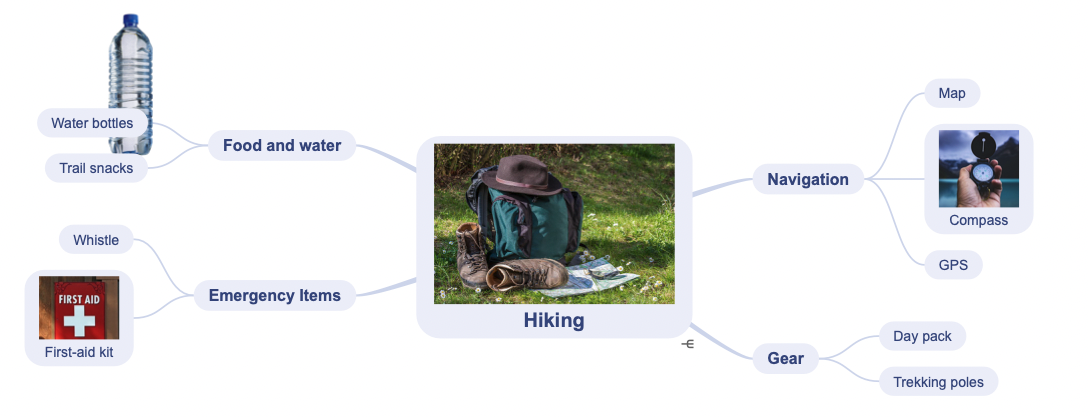
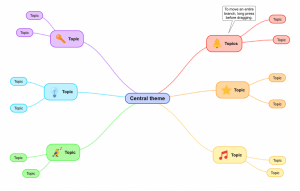
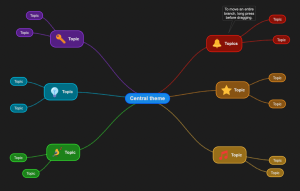
- Central theme: This is the start of the mind map. It's the title, the subject, a problem or just a thought. Starting from the central theme, add topics. This creates a hierarchy of topics, with the central theme as the ultimate parent.
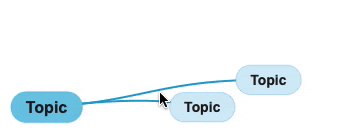
- Relation: A relation is the line that connects the parent topic to the child topic. It visualizes the hierarchical relation between the two topics.
- Cross link: A line that can connect any two topics that are not hierarchically connected.
- Tools
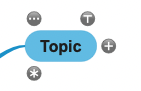
 Collapse/Expand tool :
Collapses or expands a branch.
Collapse/Expand tool :
Collapses or expands a branch. :
Click to show the topic toolbar. This toolbar has the command you use most often, for example adding images, copy or paste.
:
Click to show the topic toolbar. This toolbar has the command you use most often, for example adding images, copy or paste.  Note tool :
Adds a note to the topic.
Note tool :
Adds a note to the topic. Node-well:
Adds new topics or cross links.
Node-well:
Adds new topics or cross links. Word wrap tool:
Adds and removes line breaks.
Word wrap tool:
Adds and removes line breaks. Rotate tool:
Rotates the topic's branch.
Rotate tool:
Rotates the topic's branch. Sibling tool: This adds a sibling topic, a topic with the same parent as the selected topic.
Note! Not all features are available in the free edition of SimpleMind. See the main differences between Free and Pro on this page.
Add topics to build your mind map.
- Add a child topic with a single tap on the "add topic tool" or use "Tab".

- To add a sibling, use the "add sibling tool" or "Enter". This adds a new topic to the selected topic's parent.
- Add another central theme by double-tapping in empty space when nothing is selected.
- Insert a topic in between two existing topics by using the "Insert Topic" command from the (drop-down) menu. (Not available for iPhone)
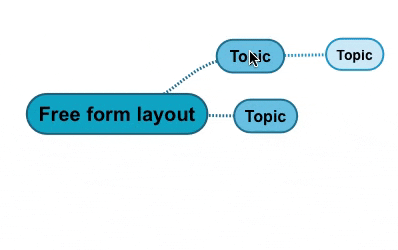
Place topics freely
Add new topics anywhere you want in free form layout.
Select a topic and double tap on an empty space. This adds a new child topic where you double tapped. Alternatively, drag and release the add topic tool or add sibling tool . SimpleMind adds the topic where you release the tool.
Add central themes
To add a new central theme, click in empty space once so no topic is selected. Next double click where you want to add the new central theme.
Tip, use the brainstorm mode to add central themes only.
Prefer a video?
See the video tutorial.
Double tap a topic to edit the topic text. Stop editing by tapping outside the text editor or press escape.
Split topics by double tapping the topic. Next use the cursor to mark where you want to split the topic and use Shift+Tab to create a new sibling topic.
Mac and Windows and iPad&iPhone: Extract text as a new topic. Select the text, use Right click (or Secondary Click) to select “Extract” so you can create a new sibling, child or parent. On iPad and iPhone, select text and use the Edit Menu to select "Extract".
Tip: Read about formatting text (bold, italic and more) or adding line-breaks (enters).
To move one or more topics to a different location, select and drag the topics.
To move an entire branch, long press before dragging. This selects the whole branch.
In free form layout, move topics around freely. Place the topics exactly where you want them to be.
In auto layout, you cannot move topics around freely. The topics are placed by the auto layout. Use drag and drop to rearrange the topic order.
Tip! Mac and Windows: Press Shift to select the entire branch without the long press delay.
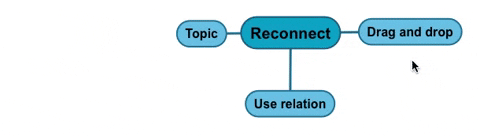
SimpleMind makes it easy to reconnect topics to another parent topic. To do so,
- Drag the topic and drop it on the new parent topic.
To keep the relative positions in free form layout, long press before dragging. - Or select the relation leading from the topic to its parent topic, and drag and drop the reconnect tool
 to the new parent topic.
- The free form layout allows you to organize your ideas exactly how you want it. Manually place topics anywhere you like, in positions that you feel visualizes best the relations with other topics.
- The auto-layout automatically places and (re)arranges the topics for you. When you add more topics, topics move to make room.

Choosing different layout
A new mind map starts in the default layout as set in "Preferences" - "General Options".
- To change the layout once, select the topic toolbar and the layout button
 .
. - To change the default layout for all new mind maps use "Preferences" - "General Options". This will not affect existing mind maps. You can also set the default layout for new central themes and for imported mind maps.
You can apply a different layout to a child topic. For example, you have a horizontal layout and you want to apply a list layout to one of its child topics.
- Select the topic toolbar and the layout button .
- Change your mind? Select the same topic again and choose “from parent” to clear the layout.
Layout direction
You can not only choose from 7 auto-layout schemes, each auto-layout also offers options such as direction. For example, you can set the horizontal layout in a way that it flows only to the right.
See more in the video
Tips
- You cannot switch from inside an auto layout to a radial layout.
- You cannot switch from a matrix layout or a radial layout to a different layout.
- Any topic that starts a (different) layout is marked with a fork like symbol
 . A matrix layout does not show this symbol.
Select multiple elements to move, or customize, all the selected elements in one go.
You can select either topics, relations, images or labels. Selected elements show a thick border.
Mac and Windows:
Click once to select a single element.Long press an element to select a single branch or use shift+click.To include, or exclude, a single element, use Control+click (Windows) or Command+click (Mac).
To include or exclude an entire branch, use Control/Command+long press.
To use Rectangular lasso selection Control+Drag (Windows) or Command+Drag (Mac) and use Shift+Command/Control+Drag to extend the selection.
Click in empty space (or press Escape) to exit multiple selection.
iPad&iPhone and Android:
Tap once to select a single element.Long press an element to start the multiple selection.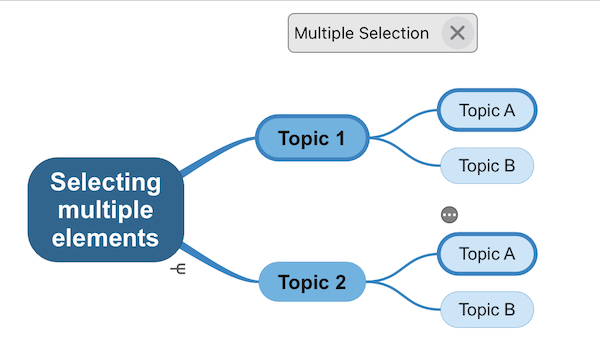
When in multiple selection mode, single tap to include or exclude an element. Long press to include or exclude an entire branch.
Rectangular lasso selection: Long press in empty space to start and drag to select.
Tap in empty space to exit multiple selection.
If you type longer texts, add linebreaks or use the word wrap tool.
Add line breaks when you type.
A linebreak breaks the line you type and starts a new line. An additional line break creates a paragraph.Windows and Mac: Use Alt+Enter or Ctrl+Enter to insert a line break.
Android and iPad&iPhone: Use Enter.
Word wrap tool
The word wrap tool ![]() adds line breaks to text. This makes the topic look less wide. Long press the word wrap tool to automatically wrap the topic.
adds line breaks to text. This makes the topic look less wide. Long press the word wrap tool to automatically wrap the topic.

The word wrap tool removes existing lines breaks before it adds new line breaks. It maintains paragraphs and lists. Those are recognized based on markdown syntax.
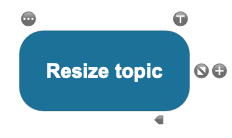
Resize the topic
Add a minimum width and height for a topic to change the topic size, regardless of topic text. You can select this via Element style. If you want to use this more often, you may want to add the "Resize Tool" to your topic tools via Preferences - General - Topic Tools. Simply drag the tool to resize the topic.
To delete topics and elements, select it. Next:
Mac and Windows: use the Delete button.
iPad&iPhone and Android: use delete ![]() from the (overflow) menu. Or use the topic toolbar
from the (overflow) menu. Or use the topic toolbar ![]() and cut
and cut ![]() .
.
Note!
Deleting a topic deletes the whole branch. Mac and Windows: Delete a single topic via the the main menu - "edit" - "delete" - "delete single topic".
Deleting a cross-link or relation does not delete topics.
Advanced features
A crosslink connects two unconnected topics.
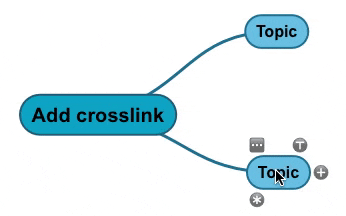
To add a crosslink, first select a topic.
- Drag the node-well and drop it on the topic you want to connect to.
- Or use the topic toolbar and select
 to add a crosslink between topics that are located a further distance away from each other.
Crosslinks look different from hierarchical relations (see A). Sometimes they look like "normal" hierarchical relations (see B). That way you can use crosslinks to merge paths and/or make a summary.
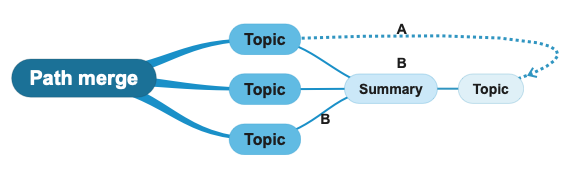
Manually toggle the crosslink style via "Toggle crosslink style" ![]() in the relation toolbar
in the relation toolbar ![]() .
.
The crosslink's path can be adjusted by dragging the crosslink (not the toolbar). The result is shown in the image above (A).
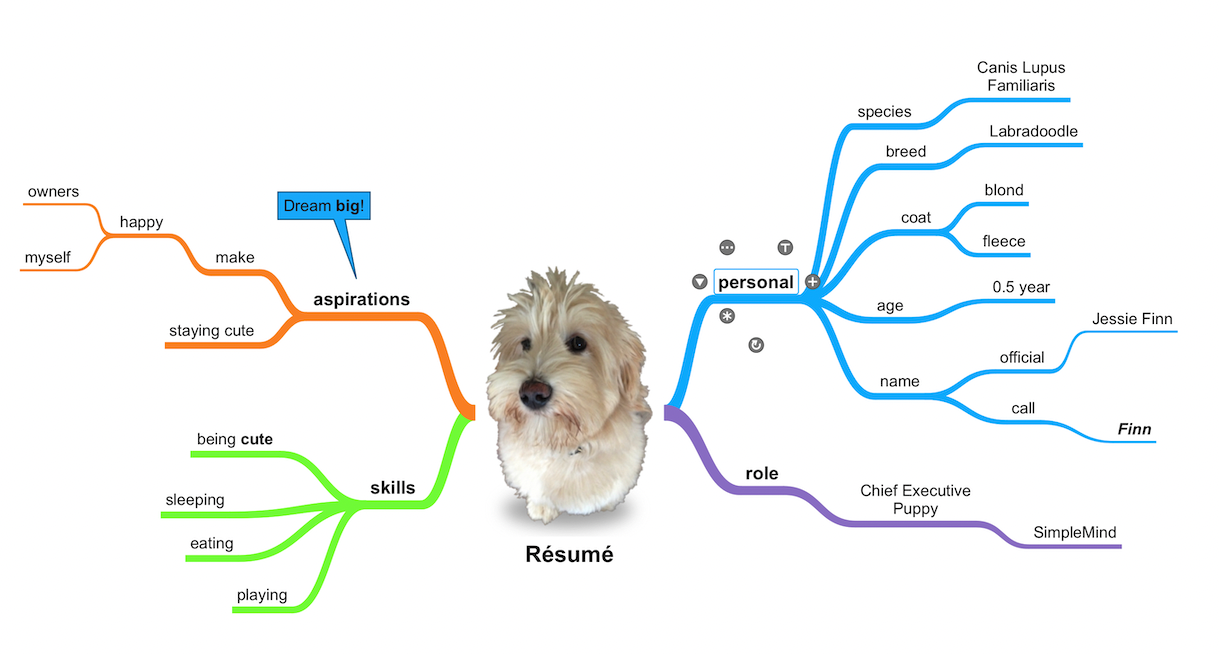
A picture is worth a thousand words, so make your mind map even more visual by adding images. Studies show that adding images even helps you remember the information better.
To add an image drag and drop it onto the topic or tap on the topic toolbar ![]() and the image icon
and the image icon ![]() .
.
After the image has been added, use the resize tool ![]() to make the image bigger or smaller. Read more…
to make the image bigger or smaller. Read more…
Add icons to topics via the topic toolbar. An icon is small image shown inside the topic. A topic has one icon at most.
![]()
Add an icon to a topic
- Mac and Windows: First show the icon inspector, to do so click on
 in the top right corner or use the main menu. Click a topic and the click on the icon you want to add.
 - iPad & iPhone and Android: Select the topic and tap on the toolbar icon and the icon button . Tap on any icon to add it to the selected topic.
Read more..
Use Notes to add text to a topic, without cluttering the mind map.
To add a note, tap on the note tool ![]() or on Desktop show the notes in the inspector via the "notes" icon.
or on Desktop show the notes in the inspector via the "notes" icon.

Once you have added note, the topic will show a small yellow note indicator in the top right corner of the topic.

Tips
- Format text in notes.
- Make a notes report to share/export all notes.
- Mac and Windows: Change the font size for Notes.
Mac: Right-click anywhere in notes - "Font size".
Windows: In Notes click "Options" - "Font size".
A label is a text element in your mind map. Labels are not part of the mind map's hierarchical structure. This means a label, unlike a topic, does not have a parent topic or child topics.
To add a label to a topic or relation, select it, use the toolbar and click on the label icon  . A topic or relation can have an unlimited amount of labels.
Read more..
A navigation link is a link to a mind map, a web page, a contact or a file. A topic may only have one navigation link.
To add or remove a link, tap on the topic toolbar ![]() and select link
and select link ![]() . After you have added the link, the topic will show a navigation icon. Tap on this navigation icon to open the link.
. After you have added the link, the topic will show a navigation icon. Tap on this navigation icon to open the link.
Tip! Drag and drop to add a link. Drag the link or file onto a topic to add a link inside that topic. Dropping it next to the topic adds a new topic with a link and a link description. This is not supported on all devices/platforms.
Read more..
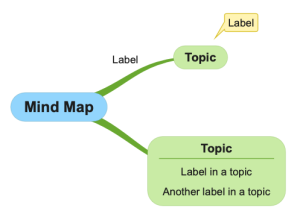
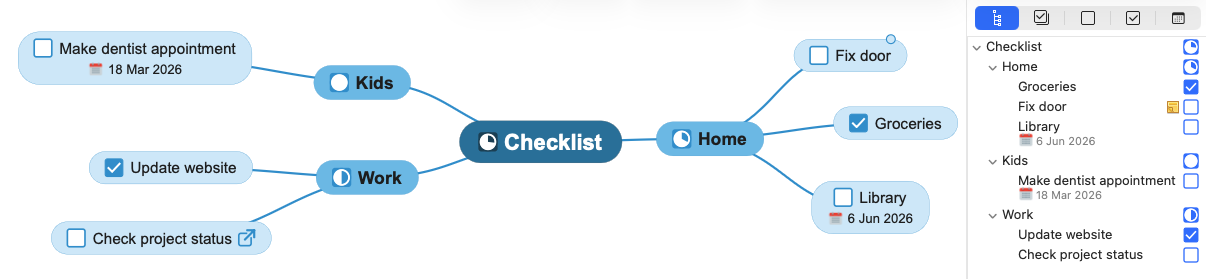
Add checkboxes, progress bars, or roll-up progress bars to topics in your mind map for better task management and tracking.
How to Add:Use the topic toolbar and select the checkbox icon ![]() . You can now select:
. You can now select:
- Checkboxes: Use these for binary tasks (checked or unchecked).
- Progress Bars: Track gradual progress, from 0% to 100%.
- Roll-Up Progress Bars: Automatically calculate total progress based on child topics.
- Smart Roll-Up Detection: The parent topic changes to a Roll-Up Progress Bar if two or more child topics have checkboxes. Apply per branch or the whole mind map.
Or enable Auto Roll-Up Detection via Mind Map Style. This feature automates Smart Roll-Up Detection, applying it continuously as you build your map.
Tips
On Mac, iPad&iPhone you can export all checkboxes and progress bars to the Reminders app. Read more...
Change the color of the tinted checkboxes and progress bars via Mind Map Style. Watch the video
Add dates to topics via topic toolbar ![]() and select the date tool
and select the date tool ![]() .
.
- Select "set date" to add a date to the topic.
- Select "add event to Calendar" (Not on Windows or Mac) to add a new event in your calendar. The selected date will be added to the topic.
- "Clear date" removes the date.
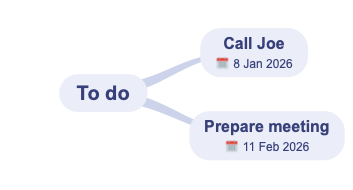
Tip! You can export all dates in a mind map to a calendar. Read more..
Group borders
A group border visually groups topics by drawing a line around those topics. To display a group border, use the topic toolbarGroup border
- Around any group of topics.
- Customize colors and shape easily.
- Click the group border to select it and;
- to delete it
- or use the toolbar to customize.
- or add or remove topics with the icon.

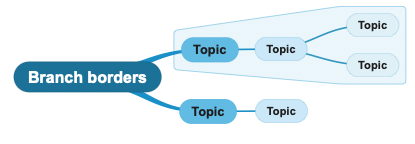
Branch border
- Always around the whole branch.
- The branch border’s colors are auto-derived from the topic’s fill color and the mind map’s background color.
- Delete by selecting the same topic, use the topic toolbar and select show branch border again.
Collapase and expand topics
Collapse topics to keep oversight in large maps. When a topic is collapsed, the whole branch is hidden. Expand is the reverse of collapse. Tap the collapse tool to either collapse or expand its child topics.
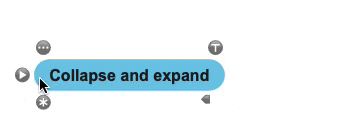
Long press the tool for additional options like collapse children, full expand, etc.
Hide and show topics
Rather than collapsing a topic, use the hide/show tool to hide and show (child-)topics one by one. To hide, select the relation (line) and tap ![]() . To show, tap the show tool
. To show, tap the show tool  .
.
Long press the tool for more options options
Display hide tool
Unlike the collapse/expand tool, the hide/show tool is not shown when you select a topic. You can change this in "Preferences" - "General Options".
Learn more in this video:
SimpleMind for iPad&iPhone and SimpleMind for Android support adding one or more video recordings to a topic if the mind map is stored in Dropbox.
To add a video recording, select the topic you want to add the video to. Use the topic toolbar ![]() , the image icon
, the image icon ![]() and tap “Add Linked Image” and “Record Movie”.
and tap “Add Linked Image” and “Record Movie”.
Once done, SimpleMind adds an image with a thumbnail of the video in the mind map. Double tap the thumbnail to play back the video.
iPad&iPhone: First enable the icon for Video recording via the menu - Customize Topic Toolbar.
SimpleMind for iPad&iPhone and SimpleMind for Android support a voice memo to a topic if the mind map is stored in Dropbox.
You can add a voice memo to a topic to record and play back audio.
To add a voice memo, select a topic. Use the topic toolbar ![]() and tap the voice memo icon
and tap the voice memo icon ![]() .
.
After recording, SimpleMind shows a voice memo icon in the topic. Tap this icon to play back the voice memo.
SimpleMind for Mac and Windows can play those back voice memos.
Style
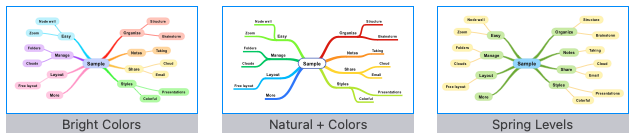
How a mind map looks is controlled by styles. The styles control everything, such as colors, topics, lines, font size, and more. Pick a style sheet to set the default style for the mind map. Customize the details by changing the style of one or more of the elements.
Style Sheet:
Top level. The style sheet controls most of what you see in the mind map. When no other style settings are applied, the Style Sheet defines the appearance of the mind map.
Select any of the default style sheets, or create your own custom style sheet.
Mind Map Style:
Use the mind map style to redefine aspects of the selected style sheet, for that mind map only.
For example, to change the background color for one mind map. Or the color of the relations.
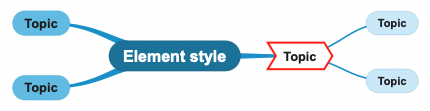
Element Style:
Use the element style to redefine the appearance for a single element. For example, to make one crosslink red.
Additionally, set Preferences that operate on a global level for all mind maps.
Tip: The layout of a mind map, how topics are organized, is set via layouts.
A style sheet contains a complete definition for a mind map’s appearance. It defines a color scheme and sub-styles for topics and relations. SimpleMind has a set of good looking built-in style sheets to quickly change the look of your mind map. When you switch to Dark Mode the built-in style sheets will also switch to Dark Mode.
Download more stylesheets here or create custom style sheets.
To select a style sheet:
Mac and Windows: Click the style sheet icon ![]() in the toolbar.
in the toolbar.
iPad/iPhone and Android: Tap on the style sheet icon ![]() or select “Style Sheet” from the overflow menu.
or select “Style Sheet” from the overflow menu.
Create custom style sheets
Create your own custom style sheet to suit your needs perfectly. Change colors, line styles, topics, crosslinks and more. Create a custom style sheet by first selecting one that resembles it. See also this in this video tutorial
Windows: Click the style sheet icon ![]() in the toolbar.
in the toolbar.
Next click the "Edit" icon. Customize and click "save" or "save as".
Mac: Click the style sheet icon ![]() in the toolbar.
in the toolbar.
Click "Edit" so that turns blue and next click the edit icon to the left of it. Customize and click "save" or "save as".
.
iPad/iPhone: Tap ![]() from the toolbar or tap “Style Sheet”. Tap "Edit". Select a style sheet. Tap the "edit style" icon at the bottom. Name the style sheet, customize and tap "Save".
from the toolbar or tap “Style Sheet”. Tap "Edit". Select a style sheet. Tap the "edit style" icon at the bottom. Name the style sheet, customize and tap "Save".
Android: Tap the style sheet tool ![]() from the toolbar or “Select Style Sheet” from the overflow menu. Tap action bar next to the style sheet and tap [+]. Name the style sheet, customize and tap "OK".
from the toolbar or “Select Style Sheet” from the overflow menu. Tap action bar next to the style sheet and tap [+]. Name the style sheet, customize and tap "OK".
- Auto numbering:
We recommend using "Numbering inside topics" when using any auto-layout. - Auto roll-up detection:
When enabled this adds automatically adds progress bars to parent topics as soon as you add checkboxes to two or more child topics. - Background color or Background Pattern
- Custom checkbox color:
Checkboxes and links are tinted according to the topic colors. Selecting a custom color changes this for all checkboxes and tinted links in this mind map. Defining (near) white as custom checkbox color results in plain black and white checkboxes and links. - Custom note indicator color:
Note indicators are tinted according to the topic colors. Selecting a custom color changes this for all the checkboxes in this mind map. - Connections:
The way hierarchical relations connect to topics (centered, baseline or left-right).
Fine-tune your mind map with Element Style. An element can be a topic, label, relation, crosslink or groupborder. Customize one or more elements, use style presets or use copy/paste style.
Open the style panel with the style icon ![]() to easily customize elements to your liking.
to easily customize elements to your liking.
Mobile devices: If you don't see the icon use the overflow menu - Style.
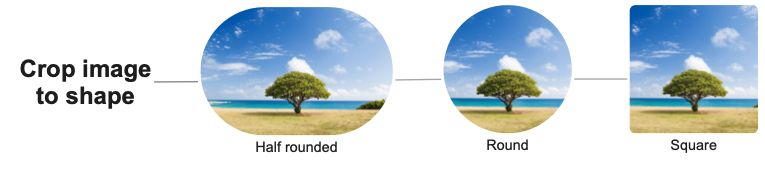
The style panel shows different commands, depending on what element you've selected. For example, when an image is selected you can select crop to shape.
Style presets
Rather than selecting the same custom combinations over and over again, use presets. A presets can apply multiple customizations in one click.- Use a style preset: In the style panel select "use style preset"
 . Select one of the style presets.
 - Create a custom style preset: Use the style panel to customize the element(s) exactly how you want. Once done, select the "add style preset"
 .
.
SimpleMind will only save your custom choices as a preset. If you customize only the topic border shape for example, that alone will be saved in the preset. As a result, you can easily apply the preset to any topic, without changing f.e. the color or font size.
Copy or paste Style
Instead of making new presets, you could use copy style ![]() and paste style
and paste style ![]() .
.

A branch based style applies colors per branch like so:
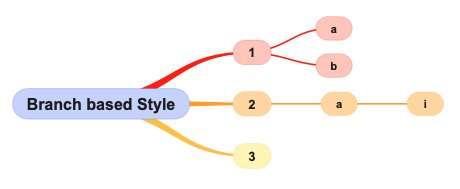
If you change a topic’s color in a branch based style, this affects the whole branch. So if you make one topic red, all child topics will be as well.
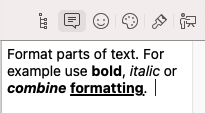
Format (parts of) text in topics, label and notes using rich text. For example, make one word italic or bold.
Important! SimpleMind for Windows can only show rich text in notes.
Windows: To format text in Notes use the toolbar in Notes. Change whole topics and whole labels via the style toolbar.
Mac: Select the text and via the menu use Style – Font.
iPhone: Select the text and use the context menu.
iPad: Select the text and use the context menu or use the toolbar of your keyboard. “A” toggles toolbar between typography and tools.
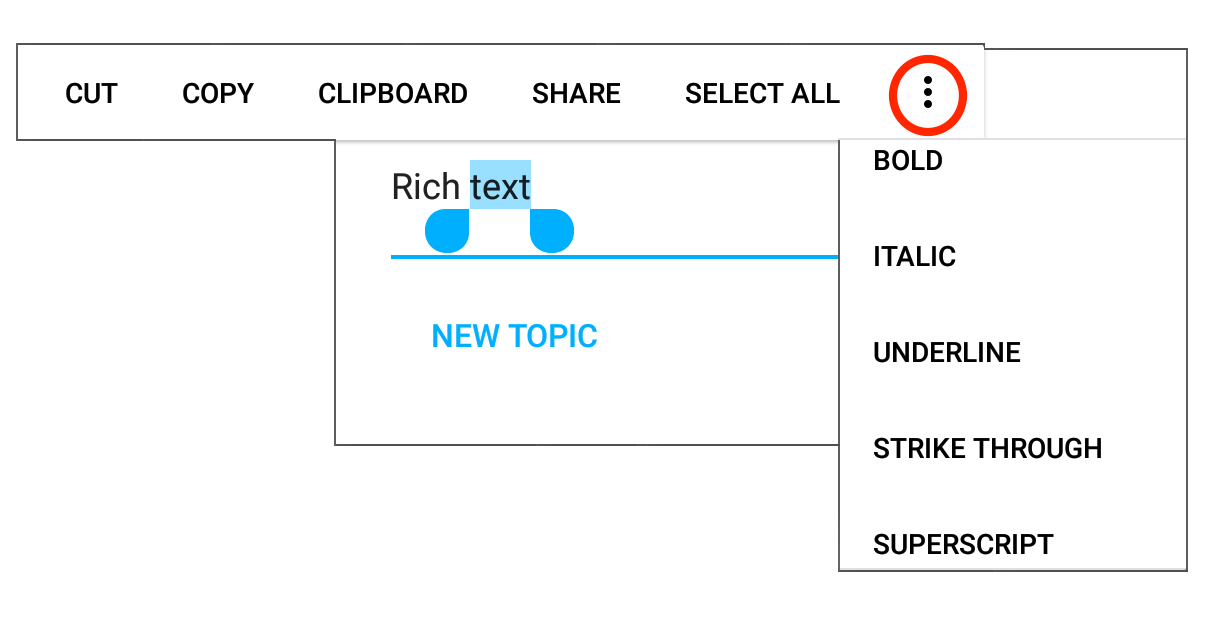
Android: Select the text and use the (overflow) menu.. Not all Android devices support this.
Note, use the word wrap tool to add line breaks.
- curved
- straight
- rounded
- or angled.
The path style is defined in the style sheet. You can change this with a custom style sheet, via Mind Map Style or per relation. Read more about that here.
In free form layout drag a relation line to manually adjust the path. Use the relation toolbar ![]() to clear
to clear ![]() the manually adjusted path. In an auto layout it's possible only to drag crosslink lines.
the manually adjusted path. In an auto layout it's possible only to drag crosslink lines.
Note for smaller mobile devices: First enable “Draggable relation lines” in Preferences.
General
The outline view can display the mind map as a hierarchical list, checklist, to do list, done list or date list.
Mac and Windows: Click the outline icon ![]() in the inspector (right side of the screen). Or via the main menu – “View” – “Outline”
in the inspector (right side of the screen). Or via the main menu – “View” – “Outline”
iPad/iPhone and Android: Select “Outline” from the menu.
In the hierarchical view you can drag and drop to reorder topics. If the mind map has an auto layout, the topics in the mind map will be moved as well. In free form layout this will only change the topic order.
Or use of the buttons next to hierarchical view to show
- Check list
The check list displays only topics with checked and unchecked checkboxes. Click to check or uncheck. - To Do list
This displays topics with unchecked checkboxes only. - Done list
Displays only topics with checked checkboxes. - Date list
Displays only topics that have a date, sorted by date.
The brainstorm bar is designed to quickly get your ideas on the canvas. It frees you from having to think about where each idea belongs within your mind map, and enables you to focus more completely on idea generation.
Once done, order your ideas by using drag and drop.
Mac en Windows: Click the brainstorm button ![]() from the toolbar.
from the toolbar.
iPad&iPhone and Android: Select “Brainstorm” from the menu.
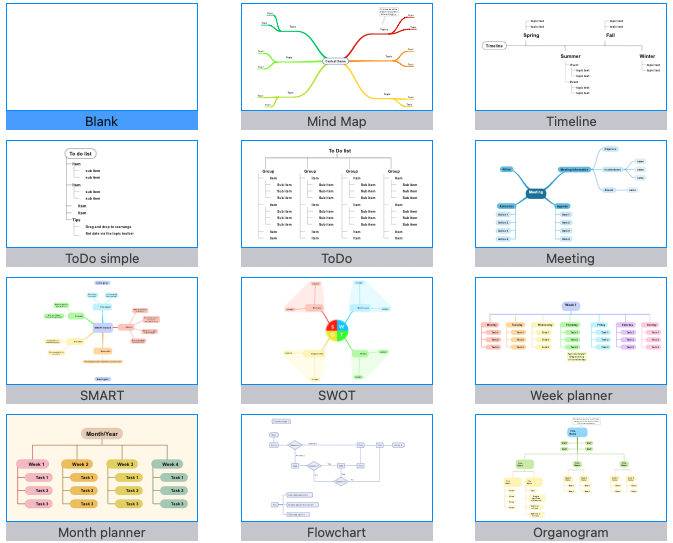
When you create a new mind map, you can select a template or start with a blank mind map. SimpleMind Pro has multiple predefined templates and you can add your own templates or download more here.
How to add a mind map as a template:
- Mac: Main Menu → File → Add to Templates.
- Windows: Main Menu → File → Share → Add to Templates.
- iPad&iPhone: Select the share icon from the toolbar → Add to Templates.
- Android: Select share from the toolbar or select "Share Mind Map" from the overflow menu→ "Add to Templates".
Easily create and play a slideshow presentation with SimpleMind. To start, open the slideshow view.
Mac and Windows: Use the inspector or the main menu – “View” – “Slideshow”.
iPad and Android tablets: select “Slideshow” from the menu.
This feature is not available for phones.
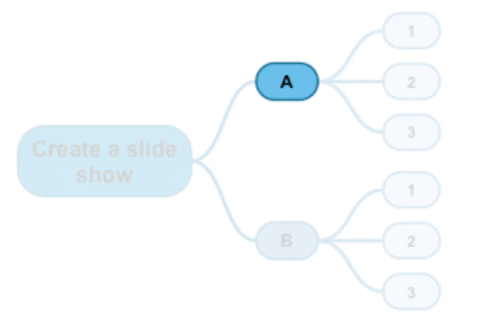
Create a default Slide Show in one tap
Tap on the "Add default slides" button so SimpleMind will create a slide for each branch.
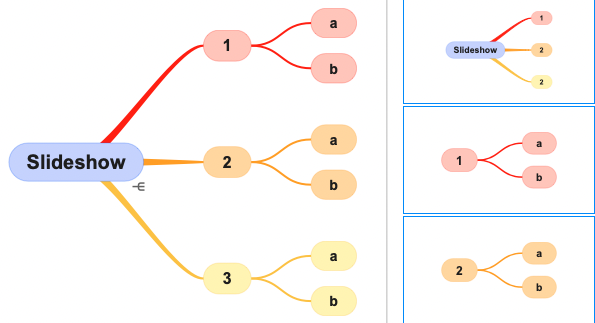
Create a custom slideshow
Select one or more topics and tap "Add Slide".
The new slide will be added after the last selected slide. Reorder the slides by using drag and drop.
See more in this video

Play or export
Start the presentation by clicking "Start Slide Show", or use "Export Slides" to export all slides as .png images. When using "Export Sildes" SimpleMind will create a .zip with all the .png images for your convenience.Tips!
- Have you changed your mind map? For example, you've made a topic red? No need to start over. Simply select the slide and tap on the "retake slide" button.
- Long press "Add slides" or "Delete" for more options.
- Select a parent topic and Use "Show Childeren sequentially". This will add new slides, starting with the parent, next the parent and topic 1, next parent and topic 1 and 2 etc.
- Add the .png images as slides into a presentation app.
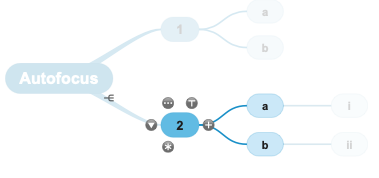
Autofocus is designed to help you focus on your ideas. It removes all the distractions while mind mapping by focussing only on the topics you are working on. You can apply it to:
- selected topic(s) only
- the selected topic(s) and the children (see image below)
- the selected branch
- lock autofocus on the selected branch. This helps you focus on one branch only, without any distractions.
- Optionally check “include cross-linked topics”
Mac: Click the autofocus button on the toolbar, or use the main menu “Zoom” → “Auto Focus”.
Windows: Select “Autofocus” from the status bar (bottom of the screen), or use the main menu “Zoom” → “Auto Focus”.
iPad/iPhone and Android: Select “Autofocus” from the menu.
SimpleMind can
- search inside an opened mind map
- search for text inside all mind maps.
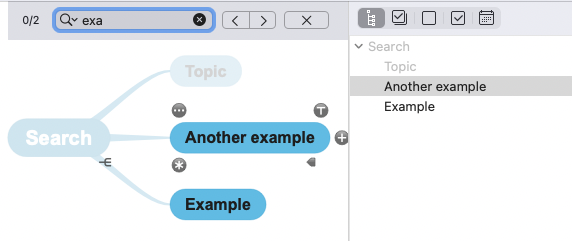
Search in an opened mind map
Use this to find topics or labels with a specific text. All other topics/labels will be faded, so the search results stand out. The search also applies to the outliner.
Mac: Command+F and enter text.
Windows: Control+F and enter text.
iPad/iPhone/Android: Select “search” from the (overflow) menu and enter text.
Tip: Use the arrows in the search window to move from the first found topic/label to the next and so forth.
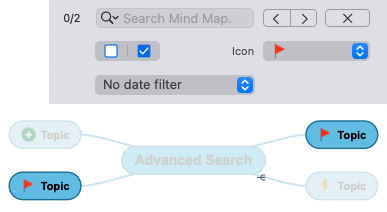
Advanced Search in an opened mind map - (Mac, Windows, iPad)
The advanced search can also filter topics by (un)checked state, a specific icon, before a date or after a date. Filters can be combined.
Long press the search tool![]() and check “advanced search”.
and check “advanced search”.
Search for text inside all mind maps
Windows: Use the main menu - File - Search in directories. SimpleMind shows a list with the found mind maps.
The first time you use this, select the directories you want SimpleMind to search in, for example "documents" and "Dropbox".
Note! In single window mode use "search" in the mind map explorer.
Mac: Use Spotlight or Finder to search for text inside mind maps, including notes. Or use the same method as Windows, see above.
iPad/iPhone: Use the Files app to search for text inside mind maps, including notes.
Or in SimpleMind first select the storage, for example Dropbox. Type the text in the search bar in the toolbar. SimpleMind shows a list with the found mind maps.
Long press the search icon![]() to select “Search Titles” or “Full Text Search”.
to select “Search Titles” or “Full Text Search”.
Android: First select the storage, for example, Local or Dropbox. Type the text in the search bar in the toolbar. SimpleMind shows a list with the found mind maps.
Long press the search icon![]() to select “Search Titles” or “Full Text Search”.
to select “Search Titles” or “Full Text Search”.
Snap options may assist you in aligning topics when using a free form layout. SimpleMind supports:
- Snap to grid When snap to grid is enabled, the topic aligns or “snaps to” the grid position, even though the grid itself is not visible. This is useful for accurate placement of topics.
- Snap to guidelines
Guidelines help align topics. When enabled, SimpleMind displays guidelines when a topic aligns with other topics. The guidelines are only displayed when you move a single topic around. See the video below.
The combination of “center horizontal” and “center vertical” guidelines is usually the best choice to keep topics aligned. Topics always keep the same center, even when you edit the topic text or change the font(size).
Another useful combination is to horizontal align left and right sides combined with center vertical. However, should you change the topic text (or font size), you'll need to re-align the left or right edges.
Select “Snap Options” in Preferences to change the options.
SimpleMind can show mind maps in Dark Mode.
The built-in style sheets support dark mode, meaning if you switch to dark mode the style sheet will as well.
For example, this is a mind map in Light Mode:
And this is the same mind map in Dark Mode:
Mac:When Mac is in Dark Mode, SimpleMind and your stylesheets will be as well. You can change this via the main menu "SimpleMind"-"Preferences" or turn this off/on for stylesheets only by clicking the options wheel in Stylesheets.
Windows: Change to dark mode via the main menu "SimpleMind"-"Preferences". Or change the stylesheets only in Stylesheets, next click the options wheel and select Dark Mode.
iPad&iPhone and Android: When your device is in Dark Mode, SimpleMind and your stylesheets will be as well. You can turn this off/on for stylesheets via the options wheel in Stylesheets.
SimpleMind can show your mind map as "Read only" to prevent unwanted edits.
Use the blue arrow in bottom right corner to easily switch to full screen. On tablets long press for options to select "Read Only".
On Mac and Windows you can use also the main menu to select "View" - "Read Only".
On phones use the menu to select Read Only.
SimpleMind for iPad&iPhone and SimpleMind for Android: When you zoom out beyond a certain point, the mind map switches to Read Only to prevent unwanted edits. You can adjust when SimpleMind changes to read-only, or even turn this off completely via Preferences - General.
Change settings that apply to all mind maps in Preferences. For example, fonts, snap options, general options and image options.
To open the preferences:
Mac or Windows: Select from the main menu “SimpleMind” → “Preferences”.
iPad/iPhone and Android: Select “Preferences” from the drop down/ overflow menu.
Fonts
Using the default fonts assures mind maps will look identical across platforms and devices. Should you adjust the default global fonts on one device, please remember to select the same fonts on your other devices.
Tip! Rather than increasing the font size, change the editor scale factor. This will make the font look bigger (or smaller).
Adjusting the editor scale factor, rather than adjusting font sizes, assures your mind maps will still look identical across all devices.
Toolbars
Select a topic and tap the toolbar icon ![]() to bring up the topic toolbar.
to bring up the topic toolbar.
 .
.
The topic toolbar is optimised for each platform and differs slightly per platform. On iPad&iPhone and on Android you customize the Topic Toolbar via Preferences.
| Copy - copies the selected topic and branch to the clipboard. iPad&iPhone and Android: "Copy as outline text" copies the complete mind map as text. Copy branch as outline will copy that branch only. |
|
| Cut or delete - cuts the selected topic and branch to the clipboard. | |
| Paste - the pasted topics are added as a child to the selected topic. iPad&iPhone and Android: Shows options "Paste as Central Theme" and "Paste text as list". |
|
| Open the style panel. | |
| Add an icon. | |
| Add an image. | |
| Add a label or a call-out. | |
| Add a navigation link. | |
| Record a voice memo. SimpleMind for iPad/iPhone and Android and only if the mind map is stored in Dropbox. | |
| Select checkboxes or progress bars. | |
| Set date. | |
| Sort child topics. Using "sort" in free form layout will only change the topic order in the outline, it will not change the topic position in the mind map. | |
| Display a group border or branch border. | |
| Change the layout. | |
| Add a cross-link. |
| Delete the relation. (iPad,iPhone and Android) | |
| Open the style panel. | |
| Clear the manually adjusted path. | |
| Toggles between "style as crosslink" or "style as relation". | |
| Add a label. |
| Send to back - rearranges the image behind other images in the same containing topic. | |
| Bring to front - rearranges the image before other images in the same containing topic. | |
| Copy - copies the selected image to the clipboard. Use "paste" from the topic toolbar to paste the image into another topic. | |
| Edit Image Link - change the image link that is opened when double-tapping the thumbnail. | |
| Change Image - select a different image or photo. | |
 |
Rotate - rotate the image. Use the two-finger rotate gesture (iPad/iPhone only). |
| Locks the image in a fixed place. | |
| Moves the image to inside the topic |
Purchase
We like to keep it simple. You need one license per platform and you pay only for what you need.
SimpleMind is available on four platforms:
- Mac
- Windows
- iPad & iPhone
- Android
For example, you want to use SimpleMind on Android and Windows. Only buy a license "SimpleMind for Android" and a license "SimpleMind for Windows".
SimpleMind 2 is a one-time purchase per platform (perpetual license), there are no subscriptions or monthly fees. All updates in SimpleMind 2 are free and included.
Click here for links to the stores
SimpleMind for Windows and SimpleMind for Mac (Direct Edition) are sold by PayPro Global.
SimpleMind for iPad & iPhone is sold via Apple’s App Store.
SimpleMind for Android is sold via Google Play.
Click here for the links to the stores
When you purchase SimpleMind in Apple's App Store or the Google Play Store, their terms and (refund) conditions apply.
- English
- Arabic (not on Windows)
- Dutch
- French
- German
- Italian
- Japanese
- Korean
- Portuguese
- Russian
- Spanish
- Simplified Chinese (not on Android)
- Thai (not on Windows)
- Traditional Chinese (not on Android)
- Turkish
The language is set by the system settings of your device.
In SimpleMind for Windows set and change the language using the main menu - SimpleMind - Preferences - General options.
Note! Support is available in English only.
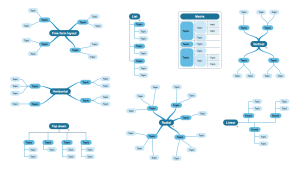
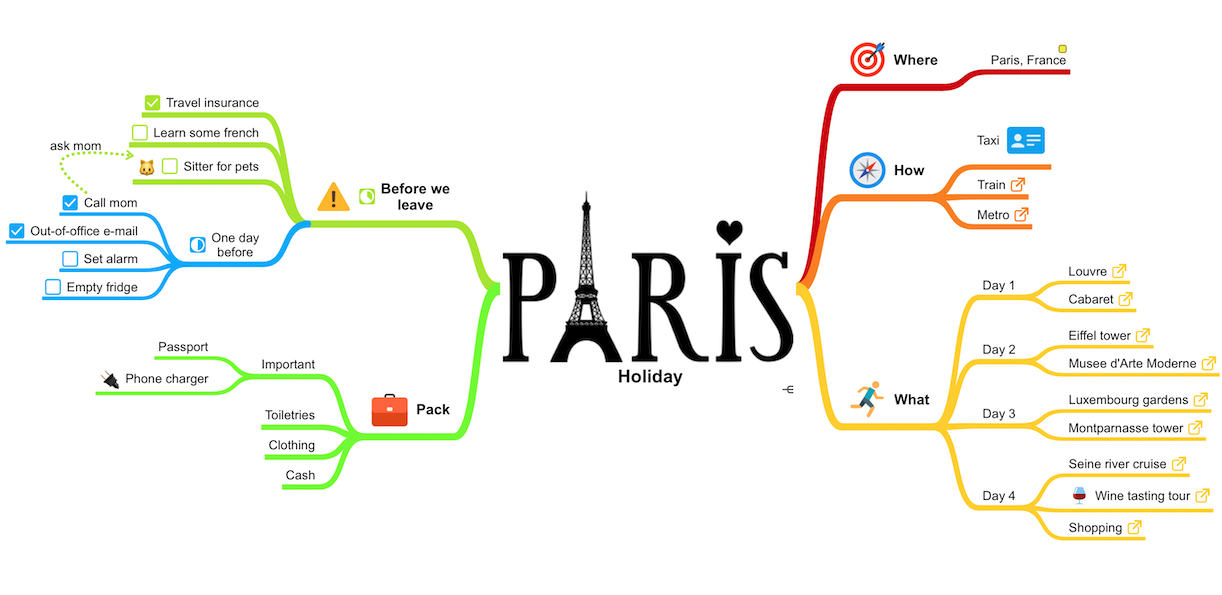
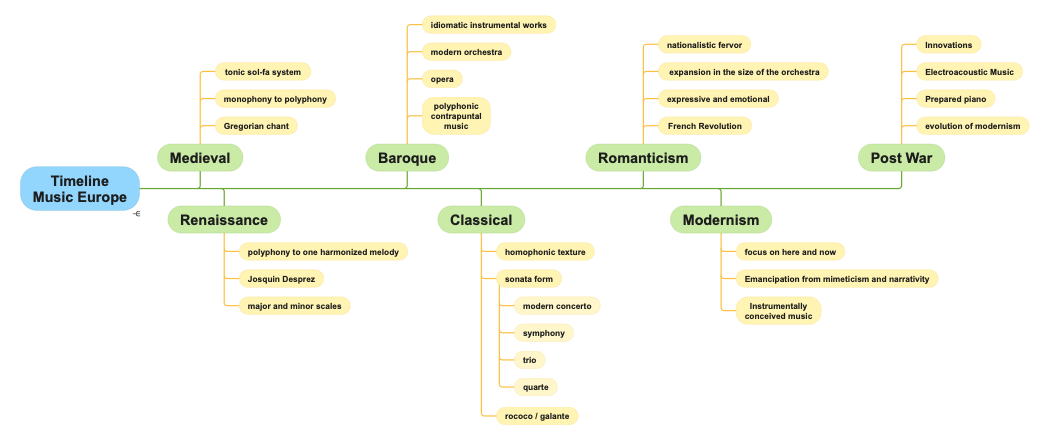
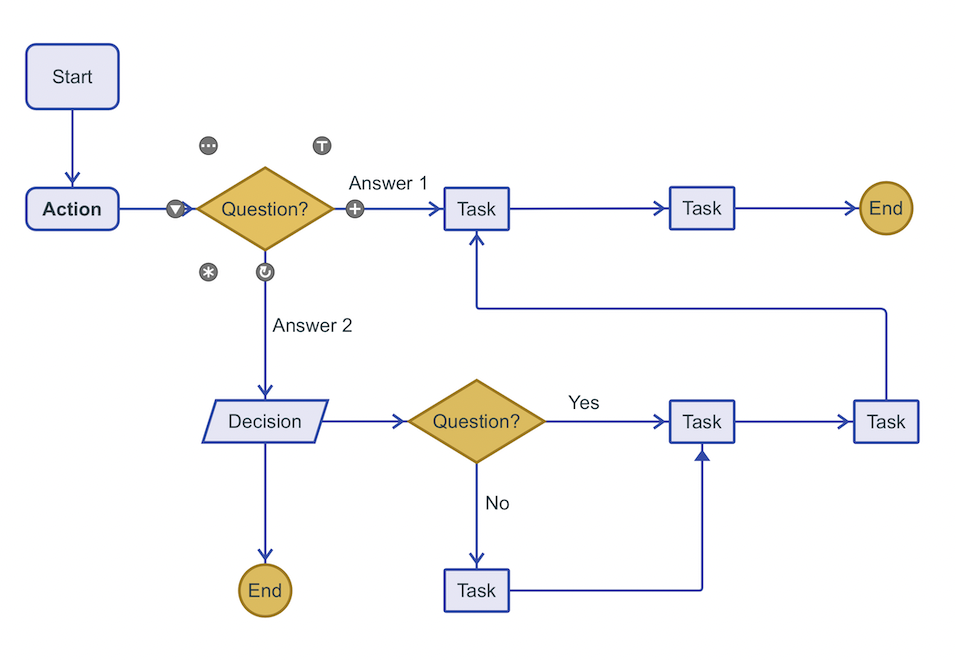
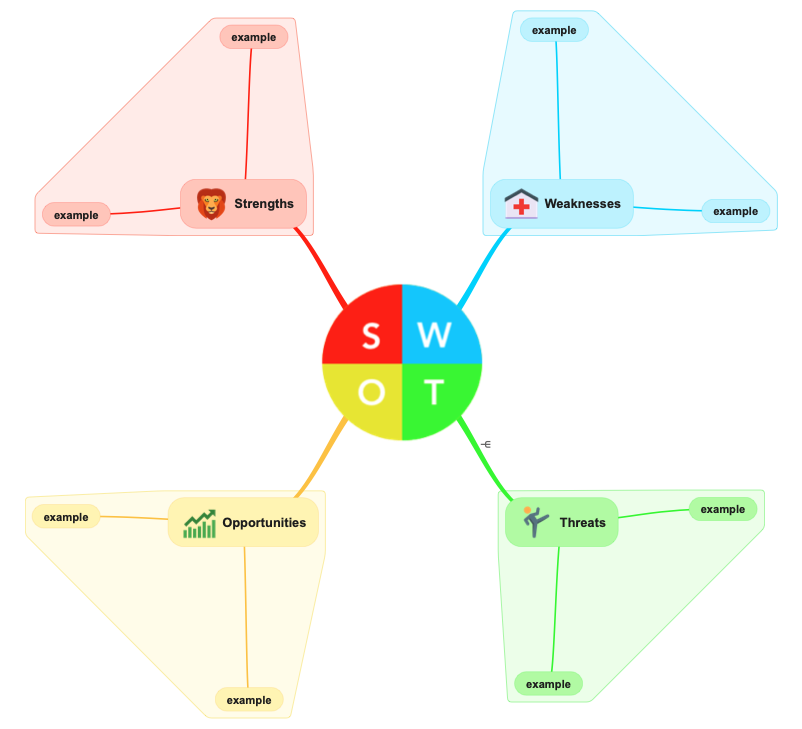
Mind Maps are used in wildly different ways. The examples below show a small selection. Click to see the full size image.
 |
 |
 |
 |
 |
 |
 |
 |
 |
Mind mapping helps you organize your thoughts, remember information and generate new ideas. We've created a beautiful, intuitive app, so you can mind map wherever you are and whenever you want.
Free editions (Mac, iPad & iPhone and Android)
- Everything you need to get started with mind mapping.
- Make as many mind maps as you want
- Free-form layout and horizontal layout
- 15+ stylesheets
- No ads
- No data collection.
- Share mind maps
- Store in any location or a cloud
- Add images. notes, icons, crosslinks, checkboxes and much more
- 6 additional layouts
- More style options
- Still no ads or data collection.
- Single purchase per platform, no subscription.
- Or see feature comparison table for more details.
Use in-app purchase now or purchase SimpleMind Pro..
SimpleMind with in-app purchase has the exact same features as SimpleMind Pro
- the Direct Edition, sold via our website
- the AppStore Edition, sold by Apple’s App Store
When working with different devices this limits the ability to open linked documents, mind maps and images. Therefore, we recommend the Direct Edition.
After purchase you can continue working with the mind maps you made using the 30-day trial or the free edition.
Mac and iPad&iPhone:If you used the free edition and purchased SimpleMind Pro as a separate app, transfer the mind maps to the new edition. See how.
Android: When you first run SimpleMind Pro you will be asked to transfer the mind maps from SimpleMind Lite. Should you decline or if this is not asked, you can transfer manually.
We like to keep it simple. SimpleMind is a one-time purchase per platform. There are no monthly or yearly subscription fees. SimpleMind is sold at the sharpest price possible per platform. Always.
Therefor we do not offer discounts, such as student or reseller discounts.
SimpleMind for Mac and SimpleMind for Windows are both sold in the same store. Because of that, we can offer combination packs. Those prices are visible here . Unfortunately, we are unable to upgrade an existing license at a later time.
Reinstall
If you're an existing customer looking to reinstall SimpleMind, please follow the steps below. Remember, a separate license is required for each platform.
Mac - AppStore edition
If you purchased in the AppStore, download again in the AppStore.- If you purchased SimpleMind Pro, install SimpleMind Pro.
- If you used in-app purchase in SimpleMind, install SimpleMind. Apple will recognize your purchase and unlock all Pro features.
Windows and/or Mac Direct Edition
Please use the original download and activation e-mail to (re)install SimpleMind.
Note: The 30-day trial cannot be activated.
Contact us for support if you do not have the delivery e-mail and include
- the original e-mail address and if possible an order number.
- or a screenshot of SimpleMind - About (via the main menu - SimpleMind – About).
iPad&iPhone
Install is handled by the App Store.- If you purchased SimpleMind Pro, install SimpleMind Pro.
- If you used in-app purchase in SimpleMind, install SimpleMind. Apple will recognize your purchase and unlock all Pro features.
Android
Download again in the Google Play Store.
Trouble installing or asked to pay again? Please click here.
Move mind maps to a new device to keep working with the mind maps you already made.
First install the paid edition of SimpleMind on the new device. Remember, you need a a separate license for each platform.
Where are the mind map stored?
- In a cloud. You do not need to copy mind maps, you only have to set-up the cloud on your new device.
- Your device only.
Copy the mind maps to your new device. You need access to your old device to do this. This may be a great time to start storing mind maps in a cloud. That way your mind maps are stored safely even if something were to happen to your device.
- Mac and Windows: Copy the files as you would any other file and use an app such as mail, or portable device, to transfer the mind maps to the new device. Still using version 1.x? Try to update to SimpleMind 2.x first so you can esily copy the mind maps.
- Android: Go the Local. At the top use the "share" icon to create a .smmstore file. On the new device open SimpleMind Pro, go to the local tab use use the "import" button. Locate the .smmsstore to import the mind maps.
- iPad&iPhone. The easiest way is to turn on iCloud (via "add Cloud"). SimpleMind will then copy all mind maps to iCloud. Or open the mind map(s) and use the "share" button for each mind map.
Moving mind maps from the free version?
The free version of SimpleMind can transfer mind maps to the paid version of SimpleMind. See how.
Files and clouds
Mind maps are saved on your device or a cloud. We recommend using Dropbox when using SimpleMind across platforms. Make as many mind maps as you want. The free editions save mind maps in a private folder on your device only.
Mac or Windows
Each time you create a new document, you name it and choose where to save it — for example on your desktop or in a folder. If you choose to save the mind map in a cloud folder, such as Dropbox or iCloud Drive, the cloud app syncs the changes with the cloud.Make sure to install the cloud app, for example the Dropbox app.
Mac: When using iCloud Drive and SimpleMind Pro for iPhone&iPad, save mind maps in the SimpleMind folder created by SimpleMind for iPad&iPhone (the folder with the SimpleMind icon). SimpleMind for iPad&iPhone is not allowed to access any files outside that one SimpleMind folder as a security measure by Apple.
iPad&iPhone
When you first start SimpleMind Pro or used in-app purchase, SimpleMind will ask if you want to use iCloud Drive. This creates a SimpleMind folder in iCloud Drive where mind maps will be saved.Or use one the built-in clouds (Dropbox, OneDrive personal, Nextcloud or NutStore) to sync your mind maps, see how to.
Alternatively, store mind maps in any folder in Apple Files - meaning you can also store in a folder created by a cloud app such as OneDrive. Not all clouds apps support this. Read more.
Android
SimpleMind for Android can save mind maps in Local (special folder on your device) or the built-in cloud Dropbox. We recommend using Dropbox. See how to connect to Dropbox.Alternatively use the Files explorer to store mind maps in any folder on your device. This includes folders created by a cloud app, such as Google Drive or OneDrive. Not all cloud apps may support this. See how to use the Files Explorer.
Note! The cloud app will synchronize the changes as it sees fit. Make sure to check you're working on the latest version as the cloud may simply overwrite any changes. Unlike Dropbox that saves both versions by creating a duplicate.
With SimpleMind Pro you can open mind maps on all your devices. For example, start your mind map on your phone or tablet and continue working on your desktop. The mind map looks the same on all devices. To sync your mind maps SimpleMind uses clouds. This is demonstrated in the video below.
Read more about storing mind maps in a cloud.
Note! You need a license per platform.
SimpleMind Pro (Mac and/or Windows) has two ways of working with mind map files.
- Multiple windows
- Single window with Explorer
You can change the application style via the main menu SimpleMind -> Preferences -> General Options.
Multiple windows
This is the style you're most likely familiar with from other apps. Mind maps, and linked mind maps, open in a new window making it possible to work in multiple mind maps simultaneously.
In SimpleMind for Mac you can optionally select to open mind maps in new tabs instead of new windows (via Preferences).
Single window with Explorer
This displays the Mind Map Explorer (navigator) on the left side of your screen. It shows thumbnails of your mind maps so you can browse though your mind maps from within the app. You can choose what directories are shown in the Explorer.

In Single Window style each mind map is opened in the same window, making it easier to focus. Linked mind maps also open in the same window, use the back button to switch back to the previous mind map.
Click on the yellow folder button to add a directory to the Mind Map Explorer such as "My Documents" and/or a cloud folder. In Windows, select a folder in C >Users > yourname as you cannot save mind map directly to C.
Show or hide the Explorer by clicking the Explorer button ![]() in the toolbar.
in the toolbar.
Share, export and import
SimpleMind Pro can import files in the following formats: .itmz, .opml, .txt and .mm
iThoughts Files - itmz.
SimpleMind imports the hierarchy (parent-child structure), notes, images, cross-links (known as "relations" in iThoughts), most icons, and links. This integration aims to make it easy to continue working with your iThoughts maps.
This works for recent iThoughts files.
.opml files.
SimpleMind imports the basic structure .opml files, capturing text, notes, checkboxes and hierarchy. This import is designed as a one-time transfer. Opml can also be used to create mind maps with ChatGPT.
Text files (.txt)
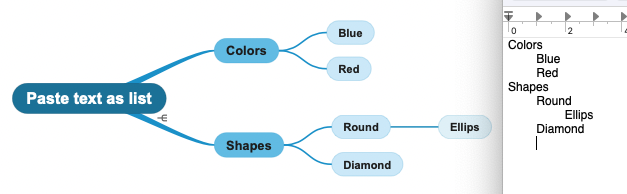
This is a quick way to turn text files into mind maps: each new line creates a new topic, and lines that start with a tab become child topics.
Tip: Use "Paste Text as List" to quickly copy text into mind map topics. On Mac, go to Main Menu > Edit > Paste > Paste Text as List. On iPad, iPhone, and Android, use the topic toolbar to select "Paste Text as List."
FreeMind (.mm).
SimpleMind imports the basic structure of .mm, capturing text, notes, and hierarchy while ignoring other attributes like links and icons. This import is designed as a one-time transfer.
How to import
Mac and Windows:
Locate the file and (double) click to open. If it does not open in SimpleMind, right click (or Control+click on Mac) on the file, select "Open with.." and next select "SimpleMind".
iPad & iPhone:
- The file is in another app: Use the share button and select SimpleMind Pro to open the file with. This opens the importer that previews your mind map. Select “Import” and the mind map will be added in the folder ”Imported”.
- The file is in the SimpleMind folder on iCloud or stored on Dropbox: Locate the file in SimpleMind. Long press and select “Convert and open”. The file will be imported in that same folder.
- Or use the Files explorer in SimpleMind and use “open” to import the file.
Android:
- The file is in another app such as e-mail: Tap the file. This opens the importer and shows you a preview of the .smmx (SimpleMind mind map file) that will be created. Tap "Import (Local) to import the mind map into the "Local" folder in SimpleMind. Or use "Convert and Open" and select where you want the file to be created, for example in Google Drive or in Downloads.
- The file is stored in Dropbox: Locate the file using the Dropbox explorer in SimpleMind. Tap once and use the import button.
- The file is stored in another cloud or folder: Locate the file using the green button in the Files explorer in SimpleMind. Tap once to see a preview and tap on Convert. Select where to store the newly created smmx and press "Save".
Read more..
Problem solving
Topics jump back after moving them
This happens when you’re using an auto layout. Learn more about auto layouts and how to switch to a free-form layout in this help article.
When editing isn’t possible (iPad&iPhone and Android)
If you’re unable to move topics or make edits, the mind map is likely zoomed out too far. Zooming out beyond a certain level switches the mind map to read-only mode to prevent unwanted changes. Simply zoom in to restore normal functionality.
This problem can be solved easily by selecting the default font. Please select the tab "Fonts", via the main menu, "SimpleMind" - "Preferences". Change all fonts back to the default font. Or select for all fonts:
- Simplified Chinese: Microsoft Yahei
- Traditional Chinese: Microsoft JhengHei
- Japanese: Meiryo
- Korean: Batang
- Mac: Use the main menu to explore all keyboard shortcuts. Assign shortcuts via your Mac’s System Preferences.
- Windows:See, or change, the list of commands via the main menu use "SimpleMind Pro"- "Preferences" - “Keyboard shortcuts”.
Using a touch screen? Press-and-tap opens the context menu (right click). Two-finger-tap selects the entire branch selection. Learn more about Microsoft Touch Gestures. - iPad: Long press the Command key to see all shortcuts.
In iOS 26 and up swipe down from the middle of the top edge of the iPad screen to reveal the menu bar. Select "Help" - "More Keyboard Shortcuts".
Note! When you are typing topic text and want to add a new topic, first use Command+Enter to stop editing. Next use Tab to add a Child Topic or Enter to add a Sibling Topic. - Android: See this list.
- I purchased SimpleMind Pro, but still see “30-day Trial has expired”.
The SimpleMind Trial and SimpleMind Pro are two different applications. Uninstall the trial, or on Mac, delete the SimpleMind trial.app. This will not delete your mind maps. - SimpleMind won’t start, I see a window "Activating SimpleMind Pro".
This means you still need to activate SimpleMind. Check this video. - It says the code is wrong or for a different product.
Please copy all the text in the e-mail. If your e-mail app automatically translates text, make sure it shows the original English text. - I am unable to download/the download file is corrupt.
If you get an error message stating that the downloaded setup file is corrupt, this is either because the download was incomplete, or a virus scanner has blocked the download. You need to temporarily disable the virus scanner and re-download the setup.
Download and (re-)install is not handled by SimpleMind, but by the store where you purchased SimpleMind. the store has access to your customer records and payment details. If you have any problems (for example you're asked to pay again for the same platform), please contact the store and/or follow the steps in their help. SimpleMind for Android. Download and (re-)install is handled by Google Play only, not SimpleMind.
- See Google Play Support for common problems
- Device is not supported. Please see this Google Help article. Usually it’s not because the application in question (SimpleMind) cannot run on your phone, but rather due to some artificial limitation. We at SimpleMind cannot see why, SimpleMind itself requires Google Play and Google Play services only.
You can use in-app purchase to unlock all Pro features. Although the name will not change, at that point you will have the exact same features as SimpleMind Pro.
In-app purchase is possible in SimpleMind for iPad&iPhone and SimpleMind for Mac (AppStore edition).
Mind maps are not stored on our servers, nor do we have access to your mind maps or data. Therefore we cannot restore your mind maps.
If you stored the mind map on a cloud, you may be able to restore a previous version of your mind map via the cloud's website. Some clouds, like Dropbox, can even restore a deleted file.
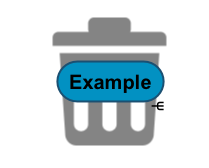
A trash-can image in the mind map means the mind map is in the trash.
Deleting a local mind map moves it to the local trash folder. To remind you that you’ve deleted this mind map, the mind map displays a trash can image. To get rid of this, move the mind map to any other folder. The same applies to mind maps accidentally created in the trash folder.
Use “Empty Trash” to completely and irreversibly delete the mind maps in the trash folder.
Local, Dropbox, or iCloud-SimpleMind
You can delete, rename, or move mind maps stored in Local, Dropbox, or iCloud-SimpleMind directly in SimpleMind. Here's how:
- Navigate to the mind map you want to manage.
- Left-swipe slightly to reveal options:
- More: Use this to rename, move, or duplicate the mind map.
- Delete: Tap to delete, or left-swipe completely to remove the mind map.
Files (Managed by Apple’s Files App)
For mind maps stored in Files, use Apple’s Files app to manage them because SimpleMind does not have permission to edit your files.
- Deleting a Shortcut: You can left-swipe in SimpleMind to delete the shortcut, but this does not delete the actual file. The file will still exist in the Files app and/or your cloud storage.
Managing Folders in iCloud-SimpleMind
To delete or rename folders in iCloud-SimpleMind, use Apple’s Files app. SimpleMind does not have permission to modify folders.
This can happen when SimpleMind was not installed via the Google Play Store. For example, you used another app/store to install SimpleMind.
The only way to fix this is to install SimpleMind directly in the Google Play Store. First make a back-up of your local mind maps (if you have any). Remove the app and install again from the Google Play Store.
Note! If you use SimpleMind Lite, it is not possible to make a back-up. Deleting SimpleMind will also delete your mind maps.
There have been several cases where using the key to switch IME (Kanji key) causes problems, including crash of Windows own Metro app.
Our Japanese customers tried the steps in this article (external link, not associated with us) and that fixed the problem. Should you prefer to google, we recommend using the search term "Windows crash IME switch”.
We hope this helps you as well.
---IME(漢字キー)を切り替えるキーを使用すると、Windows 独自の Metro アプリがクラッシュするなどの問題が発生するケースがいくつかあります。
日本のお客様は、この記事の手順を試しました (外部リンク、当社とは関係ありません)。 そしてそれは問題を解決しました。 Google で検索する場合は、「Windows クラッシュ IME スイッチ」という検索語を使用することをお勧めします。
これがお役に立てば幸いです。
Security and privacy
We never share or sell your data. You’re our customer, not our product.
What data do we collect:
- SimpleMind for Mac (Direct Edition), SimpleMind for iPhone&iPad and SimpleMind for Android:
The Play Store and the AppStore sell SimpleMind. We do not collect or have access to your personal data.
We do not have access to your mind maps or any related data (voice memos, images etc.). - SimpleMind for Mac (Direct edition) and SimpleMind for Windows:
PayPro Global sells SimpleMind and takes care of order processing and delivery. Similar to how you purchase a book from a bookshop, not from the author. After your order is completed, PayProGlobal forwards us your name, address, e-mail address and product keys. We store this in our customer database. We use this information to send you a copy of your registration details should you ever lose the original.
PayPro Global does not share payment details, such as credit card numbers. Your data is not shared with or sold to anyone else.
We do not have access to your mind maps or any related data (voice memos, images etc.).
SimpleMind asks permission when you first use that feature. That way you'll only give access for features you'll use.
SimpleMind Pro for Android could require these permissions:
- Access to microphone: required to add voice memos to topics. Recorded voice memos are uploaded to your cloud of choice. Never to our servers. We do not access the microphone for anything else.
- Access to Contacts: required to be able to add or open a link to a contact. If you don't link to contacts SimpleMind won’t need access to Contacts.
- Access to External Storage and Documents: required to be able to exchange data with other apps and to be able to store mind maps in the “External Directory”.
- Access to Internet and Network state: required to be able to synchronize with the built-in clouds.
- Install Shortcuts: required to be able to add a shortcut to a mind map on the start screen at user request.
- Access to Calendar: to be able to add an event to the calendar and read back to the event's date.
Contact us
Please contact us if you have a different question, or to send us feedback.
- Android: android@simplemind.eu
- iPad/iPhone: simplemind-touch@simplemind.eu
- Mac: simplemind-mac@simplemind.eu
- Windows: simplemind-windows@simplemind.eu
- or use the feedback button from within SimpleMind.
E-mail is the fastest way to reach us. We will answer your question as soon as possible.